For quick help getting started with Amazon Chime, see below.
For detailed help and training, please visit the help center.
For IT administrators, get started using the Administration Guide here.
Amazon Chime app setup
-
Download and install an Amazon Chime client from http://chime.aws/trial.
-
Launch the app and choose Sign in / Sign up and enter your work email address.
-
Select Login with Amazon.
-
Select Create a new Amazon account.
-
Provide your name, your work email address, set a strong password and select Create your Amazon account.
-
Grant access for your Amazon account to be used with Amazon Chime by choosing I agree.
-
Check your email and choose “Verify Me”.
-
Enter the characters presented to complete the verification.
-
Welcome to Amazon Chime!
-
Go to http://chime.aws/trial for information about downloading Amazon Chime for your other devices. Sign in using your new account and your devices will be synced.
Add contacts and chat
-
Select New Contact… from the File menu.
-
Enter the email address of a colleague you would like to collaborate with in the field provided.
-
Choose Add Contact.
-
If a user has already created an Amazon Chime account using that email address, they will be added to your contacts immediately.
-
View all your contacts by choosing Contacts on the launch pad.
-
Start a Chat by selecting Message from the launch pad.
-
Start entering the user’s name and then choose it from the auto complete list. Enter more names if you would like to start a group chat.
-
Amazon Chime Chat features include read and delivery receipts, file attachments, emojis and emoticons, search, persistent chat threads across all your devices and adjust font size with Ctrl and +, Ctrl and - and Ctrl and 0.
Start a video call
-
Move quickly from a Chat to a Call. One user initiates the Call by choosing the phone icon.
-
The other user receives the Call and selects Answer to join.
-
Select Start Webcam or Video to enable your camera.
-
Open the Visual Roster by clicking << on the far right edge of the window.
-
Use the Meeting Chat to share ideas, files and images.
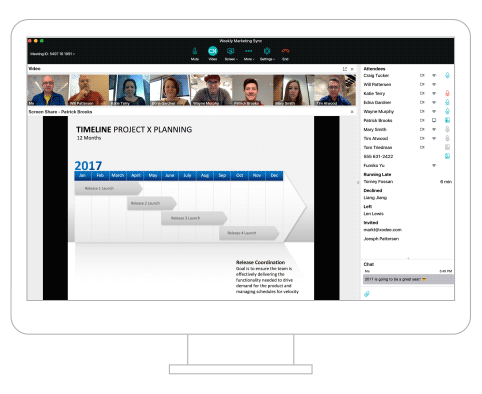
Attending a meeting
-
When you attend larger meetings, the Visual Roster provides attendee status including who is present, running late (and when they are expected to join), invited, left, dropped and declined.
-
The Audio Icon shows dial-in or in-app audio and bounces when sound is picked up.
-
Click an Audio Icon to mute another attendee who is adding unwanted sound.
-
Access other Meeting Controls to add attendees, copy meeting information to invite others or leave the call.
-
See who is sharing their screen, viewing the screen and sharing video.
-
View screen share, video, meeting chat and the roster.
Hosting a meeting
Amazon Chime provides video, screen share, recording and other features during Scheduled and Instant Meetings.
-
Call Controls are accessed under the More menu, on the Launch Pad (across the top of the window) and in the Visual Roster. Some of the most popular features include:
- Mute yourself or others by clicking on the Audio Icon.
- Toggle video on and off, pause a tile or pop video out to a new window.
- Share your display or window by choosing Screen and making a selection, including choosing to share to take over the presentation.
- Use Meeting Chat to communicate with all attendees and share files.
- Invite other Contacts to join the call.
-
Choose the Meeting ID drop down to get meeting instructions or to copy the meeting link to send to attendees that are not using the Amazon Chime app.
-
Organizer Controls are found under the More menu and include:
- Record Meeting to capture audio and screen share. The recording is processed and sent via the Amazon Chime Recordings user in Chat.
- Lock Meeting to prevent others from joining the call.
- Event Mode which mutes all others and locks down video and screen share for a more managed meeting experience. Choose Add Presenters from the More menu to grant permissions for other attendees.
Joining a meeting without the Amazon Chime app
Don’t worry, if attendees don’t have Amazon Chime or can’t install applications on their devices, they can use dial-in for audio and a web browser to view your Screen Share.
-
Start by choosing the link that is included in the meeting invite.
-
Provide the name to include on the Visual Roster and choose Next.
-
Choose the best country and use the dial-in provided and Meeting ID to join the audio portion of the call.
-
Choose Continue in browser to view the Screen Share.
-
Get the Amazon Chime application to take advantages of features such as video, the Visual Roster and Screen Sharing.
Scheduling an Amazon Chime meeting
Note: Amazon Chime works by using the calendar app you already use.
-
Open your Amazon Chime desktop App and choose Meetings then Schedule a Meeting.
-
The Schedule Meeting Assistant opens and provides options and sample instructions to include in your meeting invite.
-
Select the calendar application you use (such as Microsoft Outlook, or Google Calendar). If you’re using Outlook on Windows, a calendar add-in is available; choosing Outlook from the list and selecting Schedule with Outlook will initiate the add-in install. Consult the End User Training, Documentation or help articles from the Help Center for install and usage instructions.
-
Choose International Dial-ins and select countries to include.
-
Choose whether you would like to use your Personal Meeting ID or a special One-time Meeting ID; we recommend using a One-time Meeting ID when scheduling back to back or confidential meetings.
-
Choose Schedule with Outlook or Schedule with Google to launch a calendar window. If you use Outlook for Mac or another calendar application, follow the instructions provided and use the Copy button to populate your calendar invite.
-
In your calendar application:
- Set the meeting date, time and duration, meeting name, invite other attendees and even create recurring rules like you normally would.
- The meet@chime.aws (and pin+
@chime.aws if you choose a one-time meeting ID) are special attendees that let Amazon Chime know when to start your meeting and who to automatically call at the designated time. - When you save your meeting, make sure to send information to all attendees.
- No worries if your meeting changes; just make sure to Send Updates to All so meet@chime.aws gets updated as well.
Joining a meeting using the Amazon Chime app
-
Be sure you are logged in to your Amazon Chime app on at least one device (mobile or desktop).
-
When the meeting starts, you will hear the Amazon Chime ring, and be presented with the Join Meeting dialog.
-
Choose Join or Answer and then indicate your audio options:
- Select Use Mic & Speakers if you are the only audio source in the room.
- Select Disable Mic & Speakers if there is another user in the room using their audio or you are using an in-room video or audio system.
- Select Dial-in to connect via mobile automatically (or on the desktop app to get the phone number and Meeting ID).
-
You will then be joined to your meeting!
-
If your connection is weak or drops, Amazon Chime will try to reconnect and offer instructions to connect via dial-in.
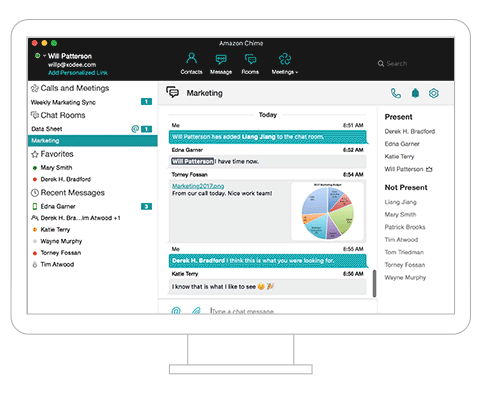
Chat Rooms and more
-
Organize your desktop Chat Threads
- Your most active threads will be listed under Recent Messages in the order that you received them (most recent at the top).
- To close recent threads hover over the name and choose X.
- Right click on a thread in your Recent Messages and choose Add to favorites to pin the thread to the left navigation under Favorites.
- Use drag and drop to change the order of the threads in your Favorites list.
-
Create a Chat Room by selecting Rooms, give it a name and invite colleagues from your contacts.
- The user who creates the Room is the first Administrator. Add other Administrators by choosing the gear icon (Room Settings) and Edit Members.
- Rooms are private and users must be invited to join. By default only Administrators can invite other members. An Administrator may choose to allow members to invite others by navigating to Room Settings and selecting Edit Chat Room.
- Open a Room that you have been invited to, choose Rooms, then select from the list.
- Present members are online and have the Room open.
- Unread message counts are displayed when you have a Room open.
- To get another member’s attention, @mention either a user by name, Present or All Members and Amazon Chime will send them a message notification.
- Choose the phone icon to initiate a call then select which members from the room to add to your group call.
Presence
-
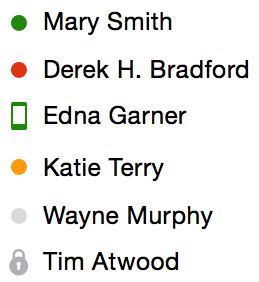
Color icons next to names indicates their status.
Green is available.
Red is in a meeting or busy.
Green mobile is not on desktop and has a mobile device available.
Orange is desktop idle (10 minutes since last keyboard/mouse activity).
Grey is the user has not been active on Amazon Chime for more than 6 days.
Lock is the user’s Presence is hidden -
Manually set your Presence to available or busy on desktop by choosing the options next to your name or on mobile by choosing your name on the Contacts tab.
-
Hide your Presence status in the Settings tab on a mobile client (“Share availability information with” Everyone or No One).
Additional setup
Claim your personalized Chime In meeting link
-
Once the Amazon Chime desktop app pops up, claim your personalized Chime In meeting link on the upper left of the window under your name and email! You can use your Chime In meeting link to start instant meetings, and to make it easier for your participants to join. Your Chime In meeting link will be included in the meeting request when you invite people to scheduled meetings.
Set your Audio and Video device preferences
-
Choose your default audio and video devices you would like Amazon Chime to use for meetings and instant calls. These settings are retained when you exit the Amazon Chime app. They are reset if you Sign Out.
-
On OSX, select Preferences from the Amazon Chime menu and navigate to the Audio and Video tabs.
-
On Windows select Settings from the File menu and navigate to the Audio and Video tabs.
Resources
Try Amazon Chime for free
Amazon Chime Pro is free to try for 30 days, with no credit card required.
After 30 days, you can continue to use Amazon Chime Basic for free, for as long as you’d like, or you can purchase an Amazon Chime Plus or Pro subscription.